浅谈Git

Git 是一个开源的分布式版本控制系统(VCS),也是个内容管理系统(CMS),可以高效地处理各种项目。

以下是 Git 的基本命令和对应操作内容的示意图:

git

新建的一个 git项目,会在项目根目录下创建一个隐藏的 .git 目录,用于存放 git 所需信息。当我们变更项目文件时是不会直接作用于 git 的,需要相关命令才能触发相应操作。一般也将 .git 目录 称之为 版本库

说明
Remote 远程仓库。
Repository 仓库区(或本地仓库),存于 .git 目录 。
Index / Stage 暂存区,即缓存,存于 .git/index 文件。
Workspace 工作区,可视的,直接操作的目录。

常用操作

1
2
# 查看帮助
$ git help
操作命令 说明
git clone 克隆远程仓库到本地,包括了工作区和版本库 。
git pull 拉取远程仓库到本地,并合并。相当于 git fetch + git merge
git add 添加变动到暂存区。
git commit 提交变动到本地仓库。
git push 发布(publish)到远程仓库。
git checkout 切换分支。git checkout 前,确保已 commit
git merge 合并分支。

git 的部分命令可能会调用 vim 文本编辑器,这里列举一些常用操作:

vim 涉及 说明
/ 输入字符即可查询。输入n 查看下一个匹配项。
i 切换光标为输入/替换模式,光标将变成竖线/下划线。
Esc 退出当前模式。
shift + : 进入底线命令模式。此时 q 为退出, w 为保存,! 为强制,可以叠加。

获取和初始化项目

git init

1
2
3
4
# 在当前目录新建一个Git代码库
$ mkdir hellow-world
$ cd hellow-world
$ git init
1
2
# 新建一个目录,将其初始化为Git代码库
$ git init <project-name>

git clone

1
2
# 下载项目和默认分支的代码历史
$ git clone git@github.com:username/hello-world.git

基本快照

Git 的工作就是创建和保存你项目的快照及与之后的快照进行对比。这里将对操作项目快照的命令作介绍。

git add

1
2
3
4
5
6
7
# 新建文件
$ touch README.md

# 添加指定目录到暂存区,包括子目录:$ git add <dir>
# 添加指定文件到暂存区:$ git add <file1> [file2] ...
# 添加当前目录的所有文件到暂存区
$ git add .

git status

1
2
# 显示有变更的文件状态(未commit的文件)
$ git status

git diff

1
2
# 显示暂存区与工作区的差异(只针对暂存区已存在的文件)
$ git diff

git commit

1
2
# 提交暂存区到仓库区
$ git commit -m <message>
1
2
# 使用一次新的commit,替代上一次提交
$ git commit --amend -m <message>

git log

1
2
3
4
5
6
7
8
# 显示commit日志
$ git log

# 历史记录的简洁的版本
$ git log --oneline

# 显示commit日志,以及变更的内容
$ git log --stat
1
2
3
4
5
6
7
# 展示当前版本树
git log --graph
# 展示所有版本树
git log --graph --all

# 显示指定文件相关的每一次diff
$ git log -p <file>

git rm / git mv

1
2
# 删除工作区文件,并且将这次删除放入暂存区
$ git rm <file1> [file2] ...
1
2
# 重命名文件,并且将这个改名放入暂存区
$ git mv <source> <dest>

高级操作

这些命令可能会具有一定的风险,请确保了解后再使用。

git reset

重置(后退)完成,依然可以通过 git reflog 查看hash,并撤销重置(前进)。

1
2
3
# 重置暂存区与工作区,与上一次commit保持一致
# (工作区新增文件,且没有加入暂存区则不会变动)
$ git reset --hard
1
2
3
4
5
# 重置当前分支的指针为指定commit,同时重置暂存区,但工作区不变
$ git reset <commit-hash>

# 重置当前分支的HEAD为指定commit,同时重置暂存区和工作区,与指定commit一致
$ git reset --hard <commit-hash>

如果以提交到远程库,需要强行推送

1
2
# 强行推送当前分支到远程仓库,即使有冲突
$ git push --force

git reflog

1
2
# 查看参考日志(包括重要的操作信息和对应hash
$ git reflog

git cherry-pick

当我们只想获得某分支的某个功能, 可以通过 cherry-pick 来直接提取某个或某几个提交 。

这个功能可以弥补多个大分支开发下, merge 的不足。

1
2
3
4
5
6
7
# 提取某个提交
$ git cherry-pick <commit-hash>

# 提取多个连续提交(左开右闭)
$ git cherry-pick <commit-hash>..<commit-hash>
# 提取多个连续提交(闭区间)
$ git cherry-pick <commit-hash>^..<commit-hash>

共享和更新项目

git remote

如果项目是 git clone 下来的会自带连接的远程仓库。

1
2
# 为本地仓库设置远程仓库origin
$ git remote add origin <url>

git fetch

1
2
# 下载远程仓库的所有变动
$ git fetch <url>

git pull

git pull 相当于 git fetch + git merge

1
2
# 拉取远程仓库的变化,并与本地当前分支合并
$ git pull

git push

HEAD 是一个游标,一般表示当前分支。

1
2
3
4
5
6
# 推送当前本地分支到远程仓库
$ git push

# 推送本地分支到远程仓库origin : $ git push -u origin <branch-name>
# 推送当前本地分支到远程仓库origin
$ git push -u origin HEAD
1
2
3
4
5
# 推送所有分支到远程仓库
$ git push --all

# 强行推送当前分支到远程仓库,即使有冲突
$ git push --force

分支和合并

使用分支意味着你可以从开发主线上分离开来,然后在不影响主线的同时继续工作。

git branch

1
2
3
4
5
6
7
8
9
10
# 列出所有远程分支:$ git branch -r
# 列出所有本地分支和远程分支:$ git branch -a
# 列出所有本地分支
$ git branch

# 新建一个分支,以当前分支和最新 commit 为基础
$ git branch <branch-name>

# 删除分支
$ git branch -d <branch-name>
1
2
# 新建一个分支,指向指定commit
$ git branch <branch-name> [commit-hash]

git checkout

git checkout 是个很危险的命令,不管是切换分支或文件,请确保已 commit ,否则可能会丢失文件记录等。

当两个分支的最新 commit 的散列码不相同时,若存在未 commit 文件,cheout 时会失败并提示;

当两个分支的最新 commit 的散列码相同时,cheout 时,未 commit 的文件会带入当另一个分支中。

1
2
3
4
5
# 切换到指定分支,并更新工作区
$ git checkout <branch-name>

# 切换到上一个分支
$ git checkout -
1
2
# 新建一个分支,并切换到该分支
$ git checkout -b <branch-name>

git merge

1
2
# 合并指定分支到当前分支
$ git merge <branch-name>

git tag

如果你达到一个重要的阶段,并希望永远记住这个特别的提交快照,你可以使用 git tag 给它打上标签。

1
2
3
4
5
6
7
# 仅添加标签:
$ git tag <tag-name>
# 添加标签,并要求注释
$ git tag -a <tag-name>

# 带tag的commit记录
$ git log --decorate

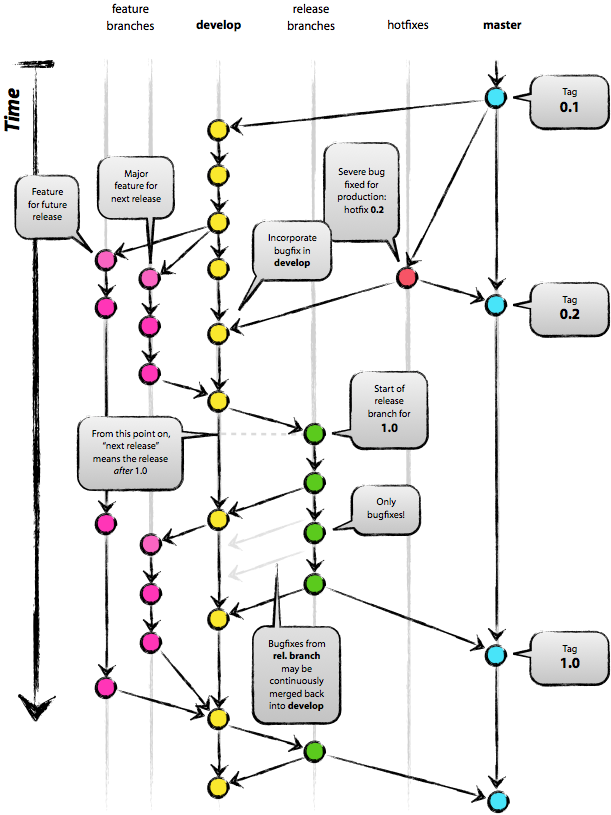
常用开发方案

git-flow

.gitignore

.gitignore 文件中配置的文件不会被 Git 管理。

1
2
3
4
5
6
7
8
9
10
11
12
13
14
15
16
17
18
19
20
21
22
23
24
25
26
27
28
29
30
31
32
33
34
*.class

# package file
*.war
*.ear

# kdiff3 ignore
*.orig

# maven ignore
target/

# idea
.idea/
/idea/
*.ipr
*.iml
*.iws

# eclipse ignore
.settings/
.project
.classpatch

# temp file
*.log
*.cache
*.diff
*.patch
*.tmp

# system ignore
.DS_Store
Thumbs.db

常见问题

多账号配置

一般个人和工作需要使用不同的 git 账号。这里使用不同的 ssh-key 来对应不同的 HostName

1
2
3
4
5
6
7
8
$ ssh-keygen -t rsa -C "personal@mail.com"
# 修改秘钥的文件名
id_rsa_personal
id_rsa_personal.pub

$ ssh-keygen -t rsa -C "work@mail.com"
id_rsa_work
id_rsa_work.pub

因为修改了默认名称,所有需要手动添加秘钥。

避免每次重启后都需要手动添加(Mac)

  • 自动操作(应用程序) -> Shell脚本 -> 添加以下命令
  • 用户与群组 -> 登录项添加
1
2
3
4
5
$ ssh-add ~/.ssh/id_rsa_personal
$ ssh-add ~/.ssh/id_rsa_work

# 验证
$ ssh-add -l

~/.ssh 下配置 config 文件

1
2
3
4
5
6
7
8
9
10
11
Host          github
HostName github.com
PreferredAuthentications publickey
User personal
IdentityFile ~/.ssh/id_rsa_personal

Host gitlab
HostName gitlab.com
PreferredAuthentications publickey
User work
IdentityFile ~/.ssh/id_rsa_work

测试配置是否成功

1
2
$ ssh -T git@github.com
$ ssh -T git@gitlab.com
1
2
3
4
5
6
7
8
9
10
# 取消全局用户名和邮箱
$ git config --global --unset user.name
$ git config --global --unset user.email

# git仓库中分别设置
$ git config user.name "personal"
$ git config user.email "personal@mail.com"

$ git config user.name "work"
$ git config user.email "work@mail.com"